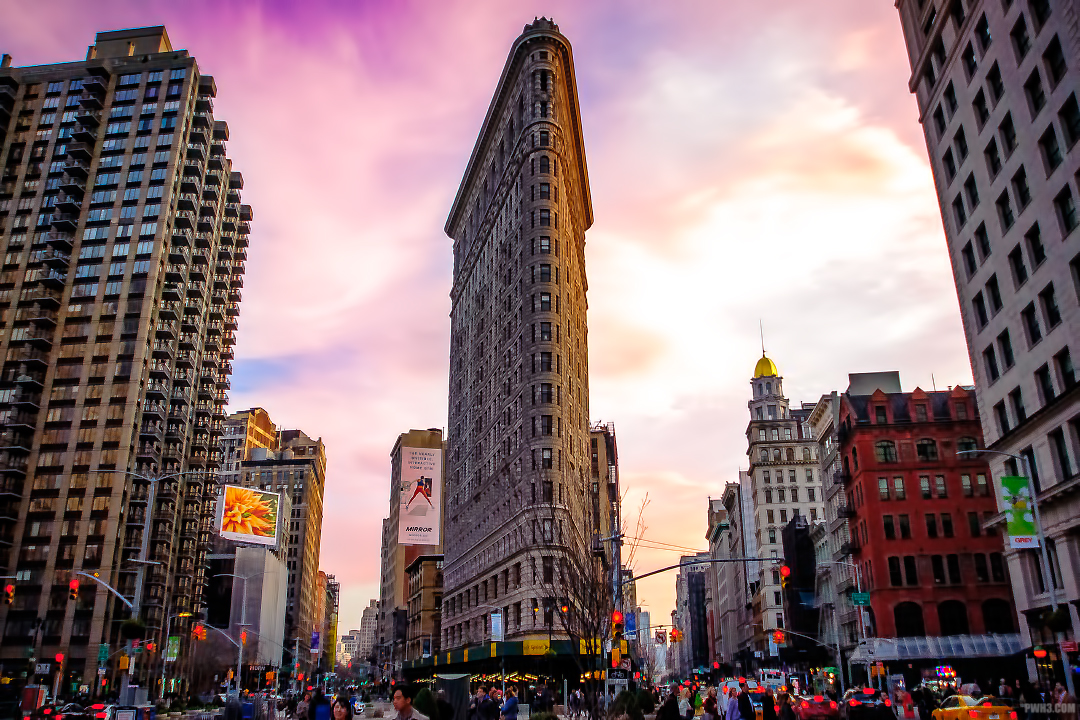
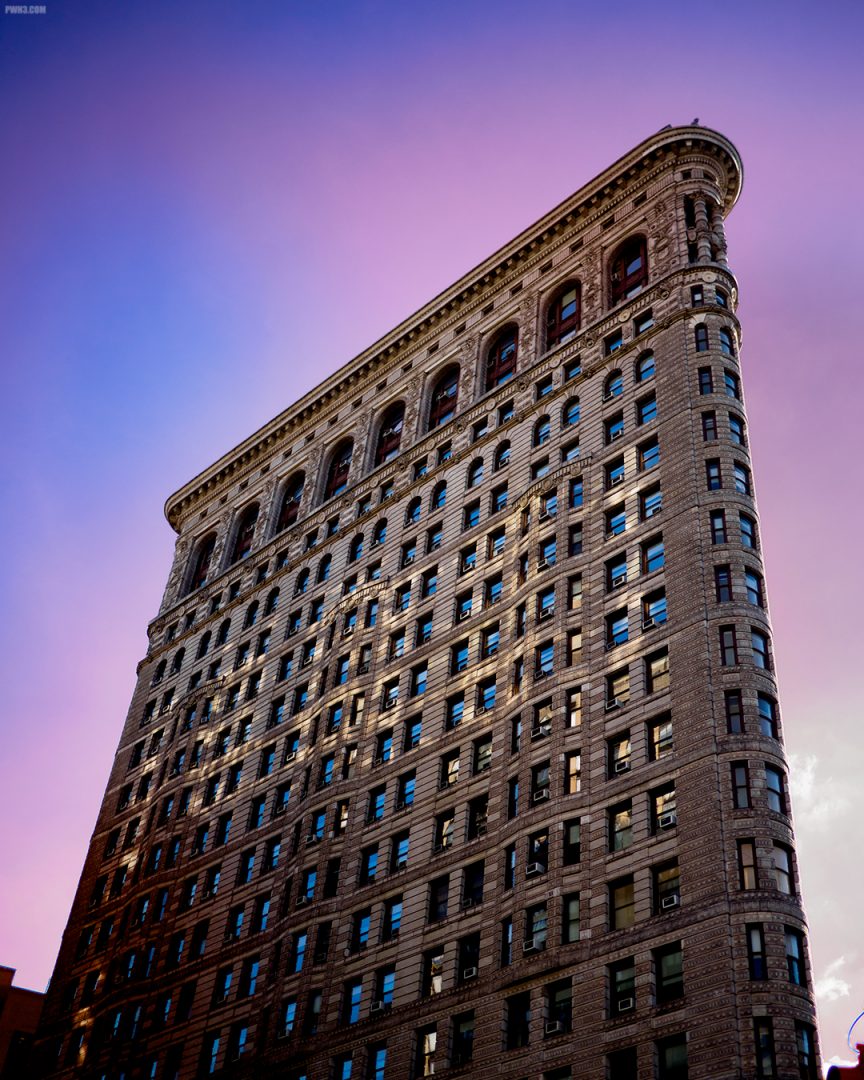
Everyone seems to love the Flatiron Building. A lot of tourists have told me that it’s their favorite building in New York City. The relatively short height of the building, its unique shape, and the detail of the architecture make it very interesting to photograph.
Exit the subway at 23rd street and look up — it’s the Flatiron Building!
The Flatiron Building is located at 175 Fifth Avenue, which is very close to 23rd street in Manhattan. If you want to visit it, take the R or W train to the 23rd street station. You can use any subway exit and you’ll automatically be in a great position to take a picture of the Flatiron Building, since all of the station’s exits will leave you across the street from it.
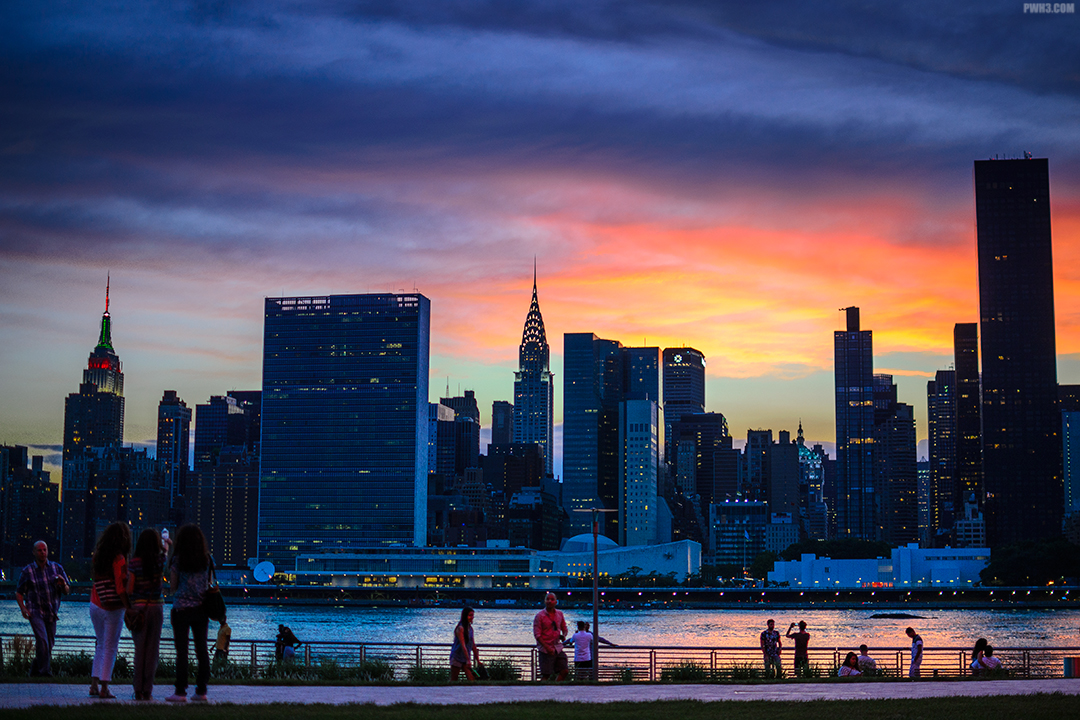
New York City has one of the most beautiful and iconic skylines in the world, thanks to all of the tall and unique buildings on the island of Manhattan.
But of course, you can’t photograph the full skyline while on the island — you have to travel outside of Manhattan to do it.
While there are many spots to photograph the skyline, I feel one place is much better than all of the rest to do it, and in this article I’ll explain where that is and why.
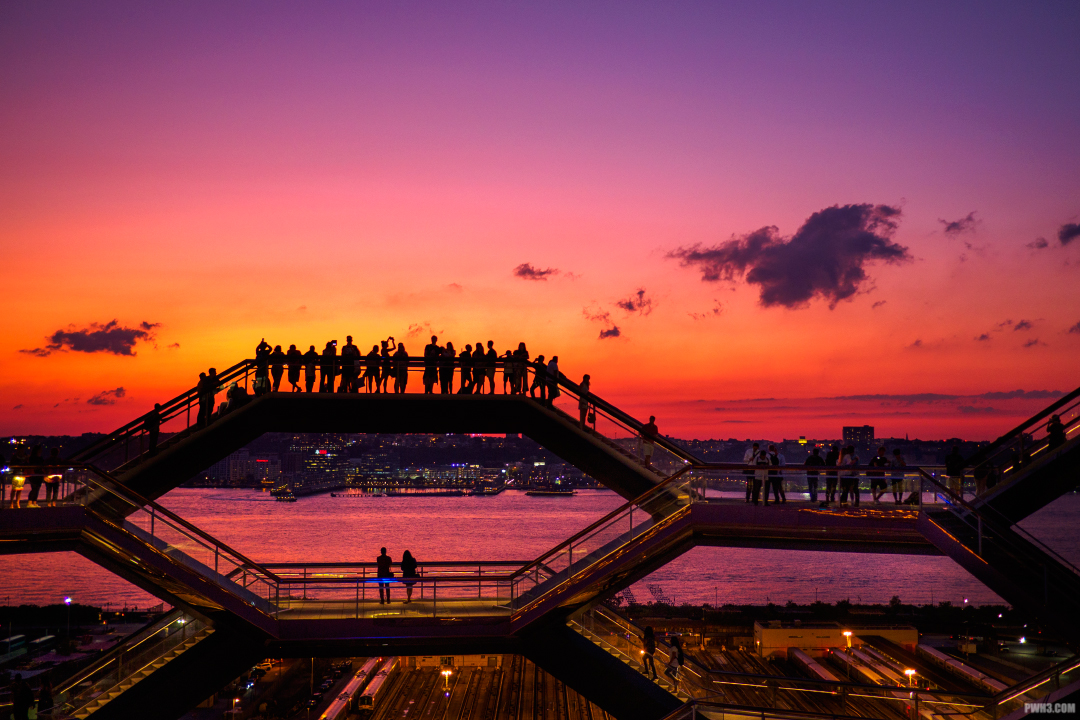
The Vessel is a new structure built as part of the revitalization of the Hudson Yards area of the West Side of Manhattan. Construction of The Vessel began in April of 2017 and it opened to the public in March 2019.
They might look like it, but no, these aren’t mall escalators!
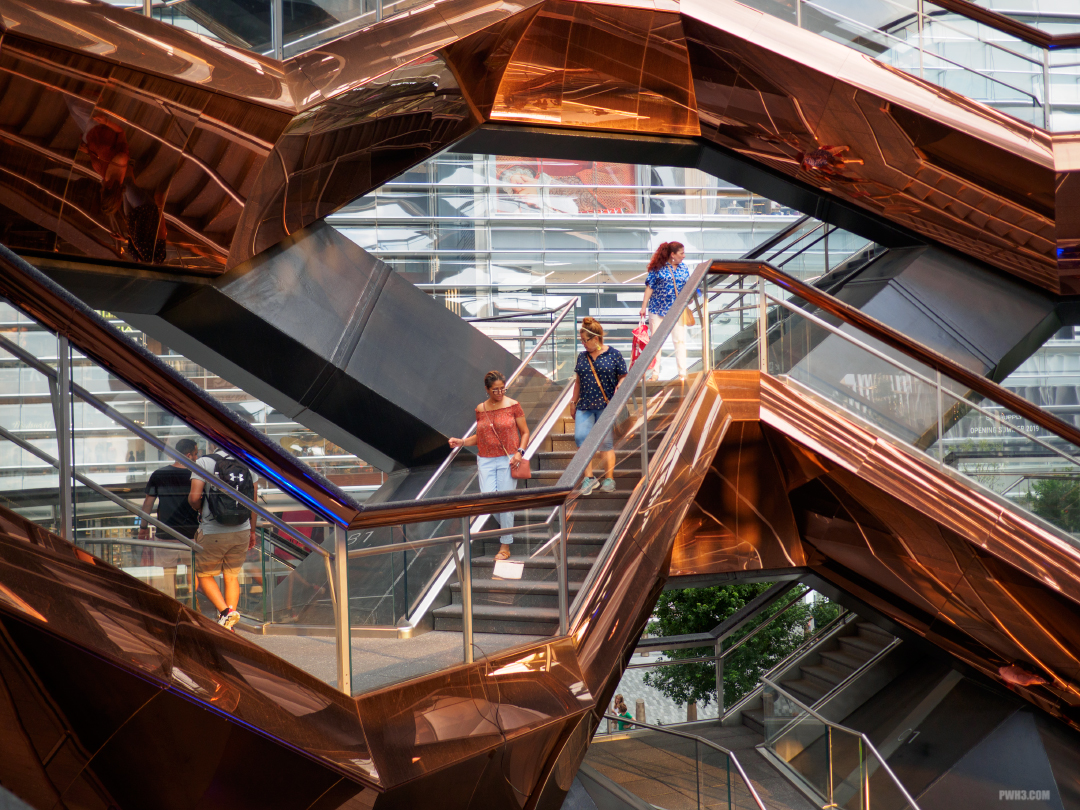
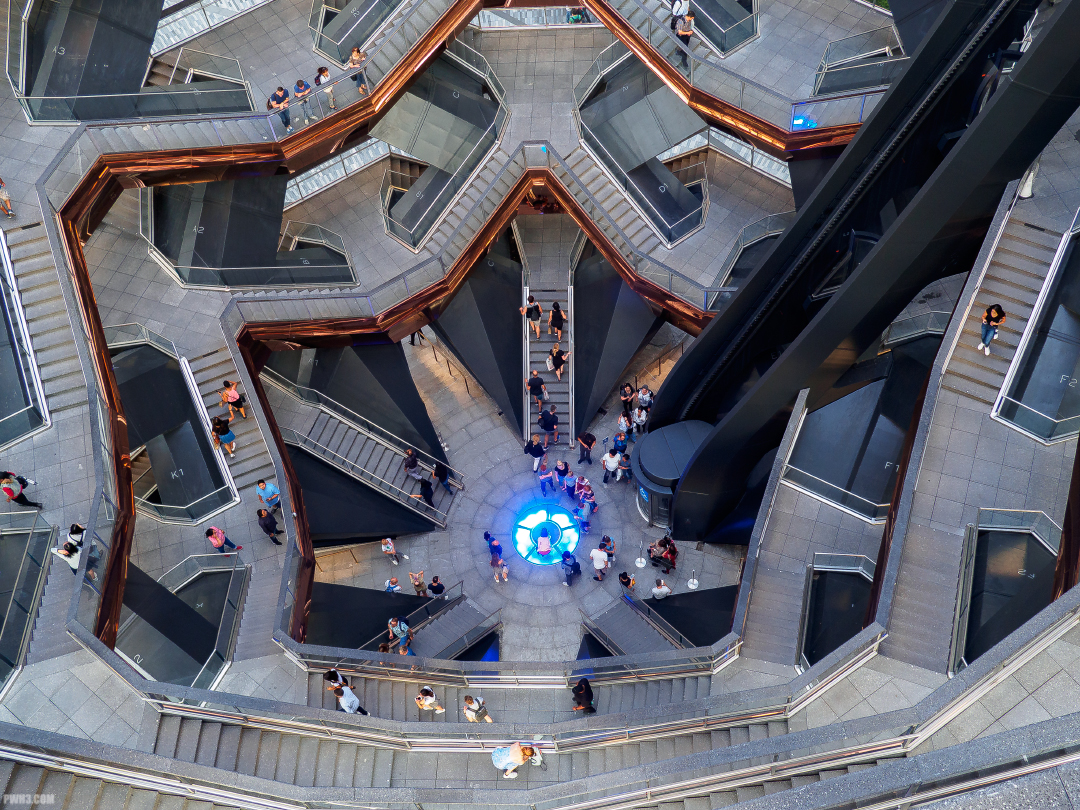
The Vessel consists of a series of interconnected staircases and tiers designed to allow visitors to walk from the bottom to the top of the structure easily. The Vessel is 16 stories tall and consists of 154 flights of stairs totaling 2,500 steps.
I’m not afraid of heights, I’m afraid of falling.
Looking down from the top tier, one can see how elaborately designed and constructed The Vessel is. For those that can’t or don’t wish to walk up and down the stairs, there is also an elevator, which you can see on the right side of the photo above.
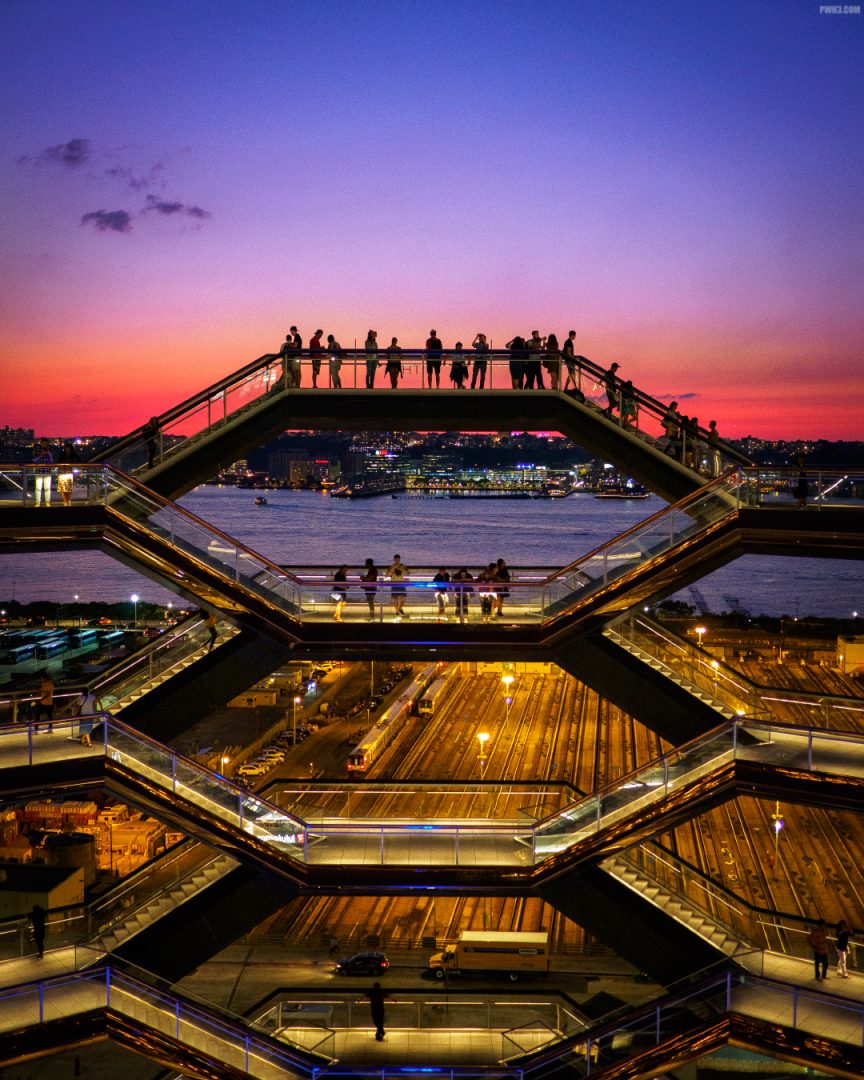
Are they waiting for the sun to set, or for a train?
The Vessel offers great views of the Hudson River and the distant New Jersey skyline. In the photo above, visitors wait on the top tier facing West to catch the sunset. Below you can see the rail yard – that’s where Hudson Yards gets its name.
As the sun sets it brings out amazing colors in the sky. It’s best to plan a trip to the Vessel around sunset time. Tickets are free but must be reserved in advance. Reservations fill up quickly, so be sure to reserve them a week or two ahead.
It’s time for some moon shopping.
After the sun sets, the revitalized Hudson Yards area is a great place to hang out at night. It’s still under construction, but so far a shopping mall and arts center have been built in the area and more attractions are planned.
Have you visited The Vessel at Hudson Yards? What was your experience like? Let me know in the comments, and follow me on Instagram.
If you’d like an NFT of my sunset photo of The Vessel for your collection, visit here.
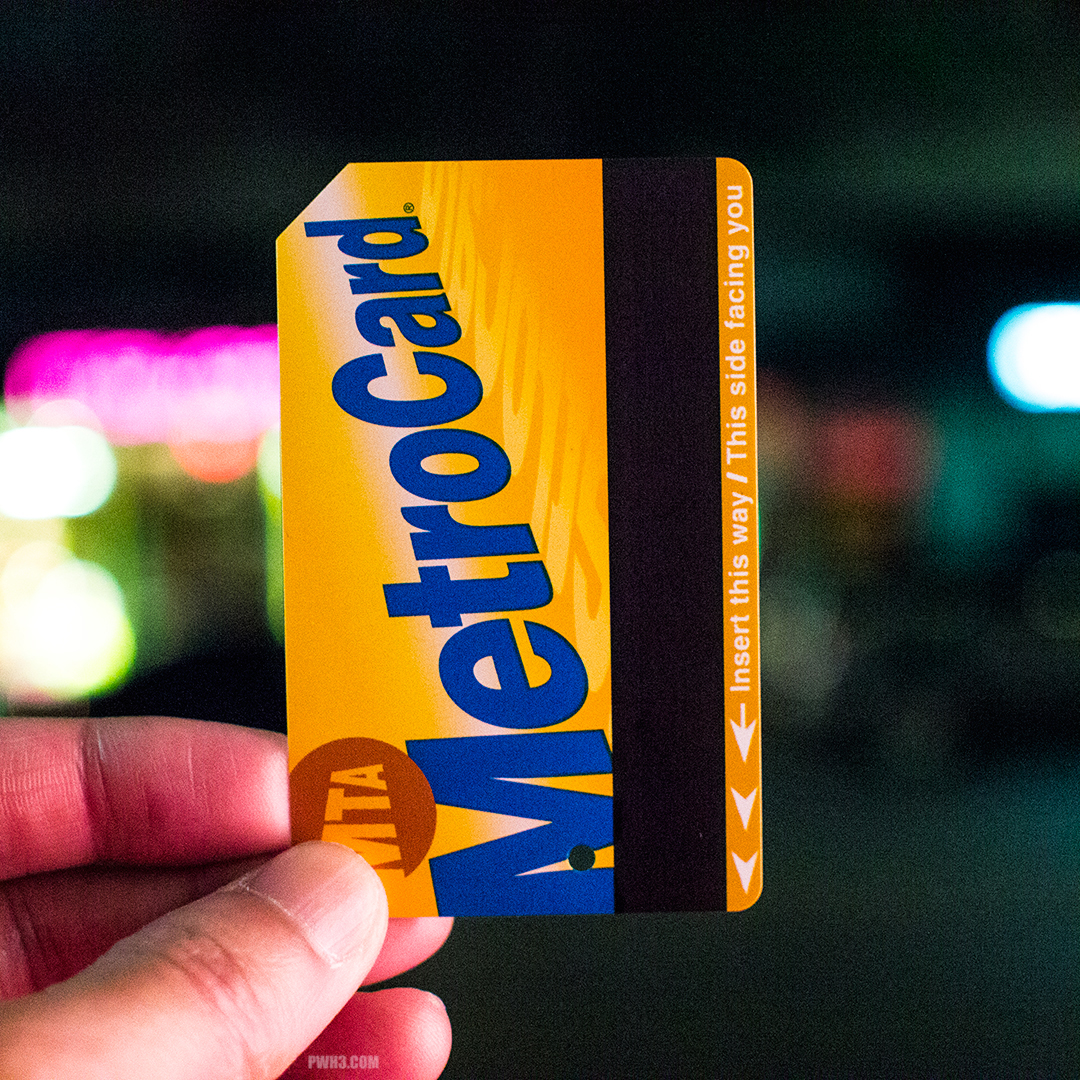
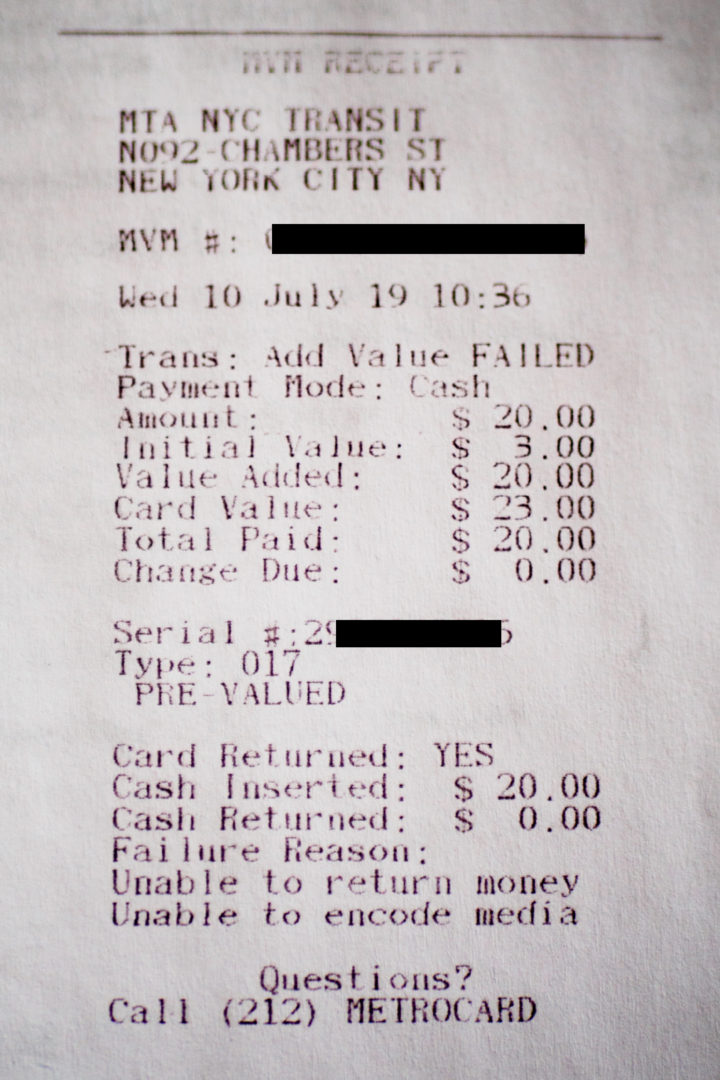
I was coming back from photographing an event in Manhattan, and wanted to add money to my MetroCard because I had a few more places to go to that day by subway and bus. When I tried to add more cash to the card, the machine gave an error, and took the twenty dollar bill without putting anything on the MetroCard. It spit out a receipt that showed an error code. The MTA had just stolen the money.
Robbed in the New York City subway.
I thought no big deal, I’ll just show this to the MTA employee working in the booth and get my money back. But of course, we are dealing with the MTA here: even though it just happened, even though I was holding the card that caused the error, and even though I had the freshly printed error receipt from the machine in my hand, the dude told me he could not refund me the money or even just electronically put the twenty bucks I lost onto the card. He said I had to contact the MTA for a refund. By writing them.
Luckily that wasn’t my last twenty bucks; I had more cash on me. But what if I didn’t? I guess I’d hop the turnstile like everyone else. Anyway, I spent another $20 getting a totally new card from the booth attendant and got on the next train.
The receipt of doom!
The process of getting a refund from the MTA is, naturally, a pain in the ass. First, make sure you keep that receipt AND the MetroCard associated with the messed up transaction. You will have to mail both of them to the MTA as proof of what happened. So even if you think the MetroCard is busted, don’t toss it out, and don’t try to use it again anywhere else. Maybe put a small mark on it with a Sharpie so you don’t get it mixed it up with another card.
You will have to print out and fill out the form located here:
The form is, of course, badly designed — I found it hard to write the letters of my address and all the other stuff inside those stupid little boxes. Then there’s a section of the form where you’ll have to write in all of the information that’s already on the receipt, because why not.
When you’re done, put the form along with the receipt and the MetroCard into an envelope and mail it off to the address on the form. And wait — it took about three months for the MTA send me back a new MetroCard.
It seems that every photographer dreams of some day owning a digital full-frame camera. The lure of full-frame is strong, with promises of photos that have less noise, better retention of shadows and highlights, better color accuracy, and that amazing shallow depth-of-field.
However, improvements in sensor technology have made APS-C and even Micro Four Thirds (m4/3) nearly equal to full-frame cameras in many of those areas. In my opinion, the main reason to move to a full frame system is if you really need very shallow depth-of-field at normal to wide angles (such as 50mm, 35mm, 28mm, 24mm, and so on). Otherwise an APS-C or m4/3 will probably serve you better, and for much less cost.
That being said, if you really want a full-frame camera but don’t want to spend a lot of cash, there are lots of used options among older models. Once selling for thousands of dollars, these old full-frame cameras can now be had for mere hundreds.
Enter the Nikon D700
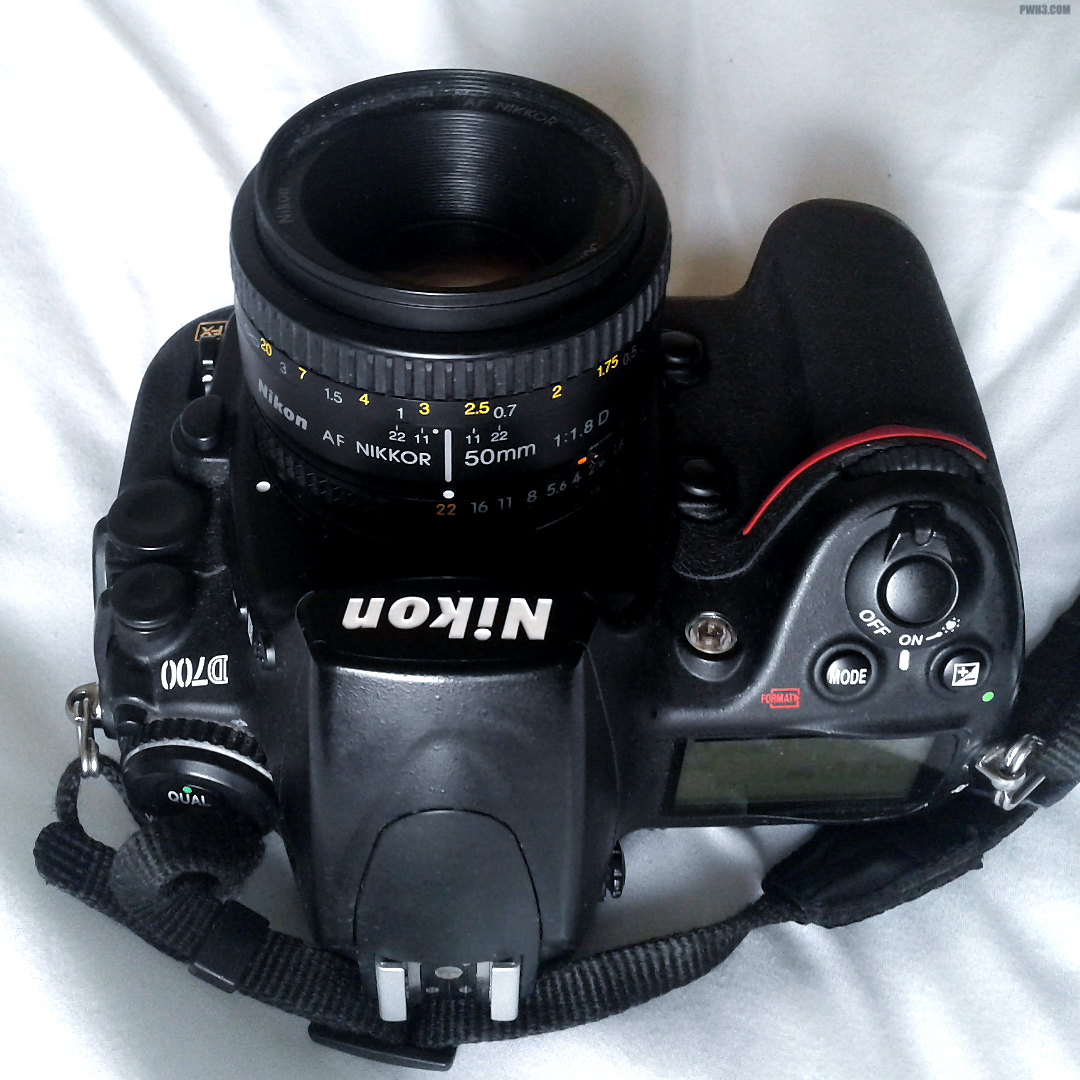
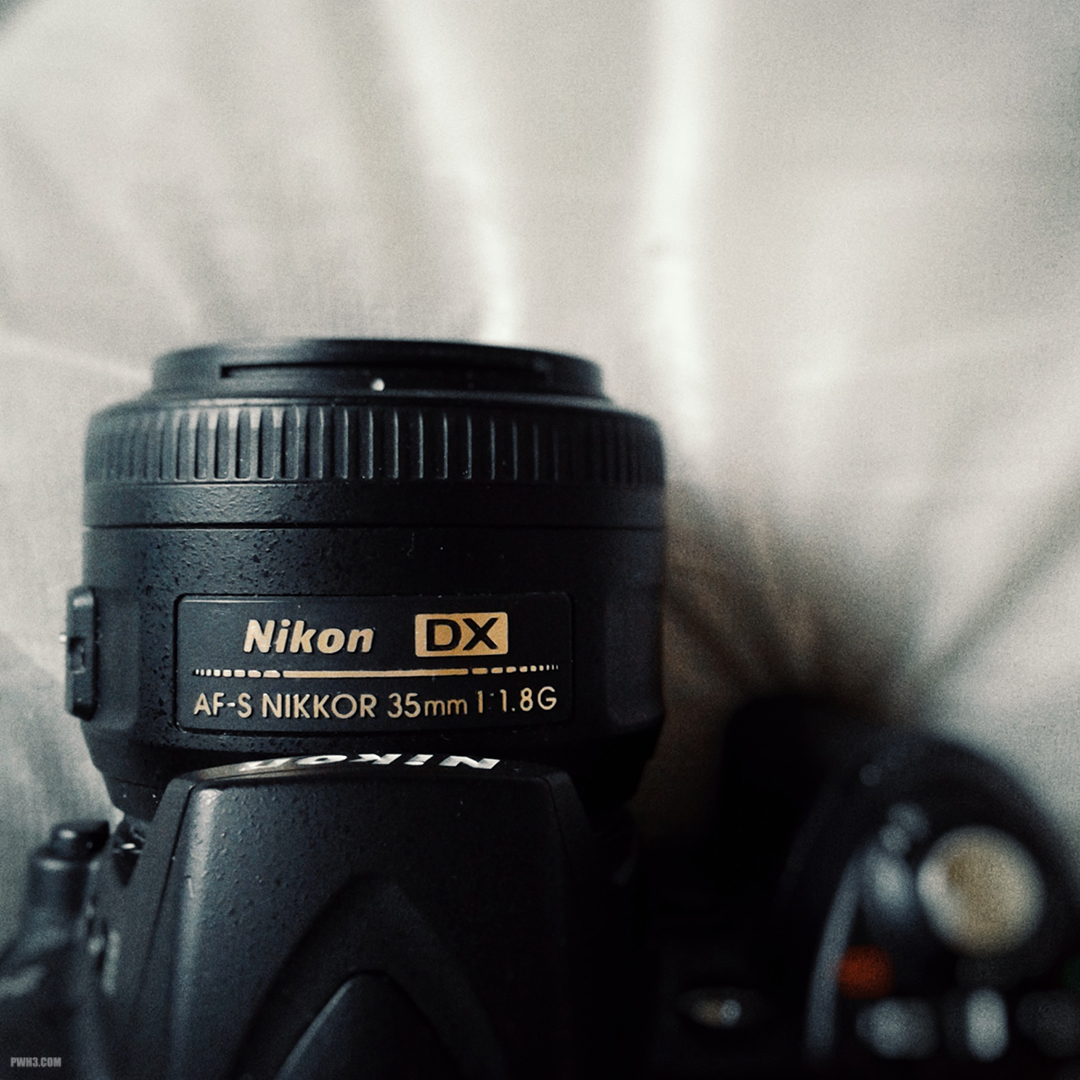
The Nikon D700 is a legendary camera. It has always reminded me of a digital version of Nikon’s F4 film camera in terms of cult status and aesthetic. And much like the Nikon F4, I have always wanted one (and now own both). The Nikon D700 originally retailed for $2999.99 back in the year 2008. In the used market today, you can pick one up for around $399 — or even less if you are patient and find a good sale. At this point, it’s the cheapest viable way to enter the world of full-frame photography.
A well-used Nikon D700 poses on my bed.
Using an Eleven Year-Old Camera
So how does the Nikon D700 hold up today? Pretty well. It’s a rugged, solid, weatherproof camera. It’s *very* heavy but feels good to hold. The grip is perfect. The controls are great. The viewfinder is enormous and clear. And the full-frame images are… alright.
Spring 2019 near Times Square. Nikon D700 and the even older Nikkor 24mm-120mm f3.5-f5.6D “Streetsweeper” at 24mm.
A Camera for the People
Color rendition at lower ISOs is excellent and true-to-life. Highlights and shadows in brightly lit scenes are preserved well. Blue colors seem particularly vivid, as is the case with many older Nikons. Skin tones at the base ISO are pretty good. The D700 seems to excel as a portrait or “people” camera, perfect for events.
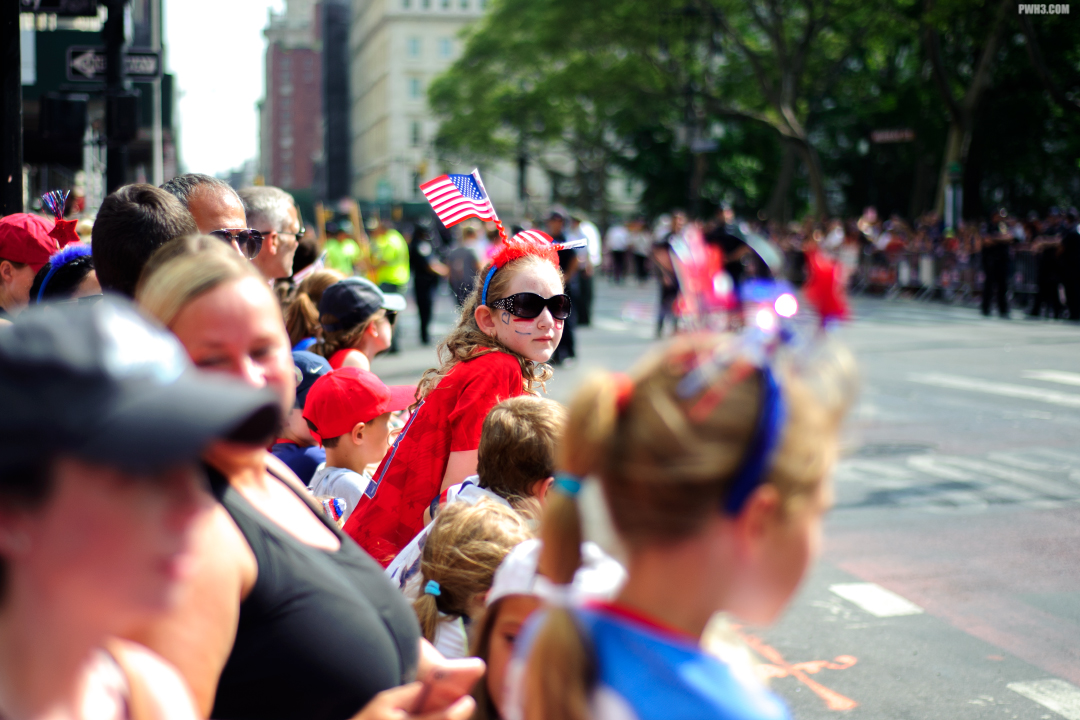
Waiting for the US Women’s Soccer Team’s New York City victory parade to start. Nikon D700 and Nikkor 50mm f1.8D at f1.8, ISO 200.
ISO Performance & Color
As ISO increases, the color rendition does not hold up as well, though that’s true of many cameras. The further up the ISO ladder you go, the more washed-out and inaccurate the colors become. When you reach ISO 3200 and beyond, you may find magenta or green color casts in a lot of your images.
Night Lights. Nikon D700 and 50mm f1.8D at f1.8, ISO 450.
Difficult Shooting Situations
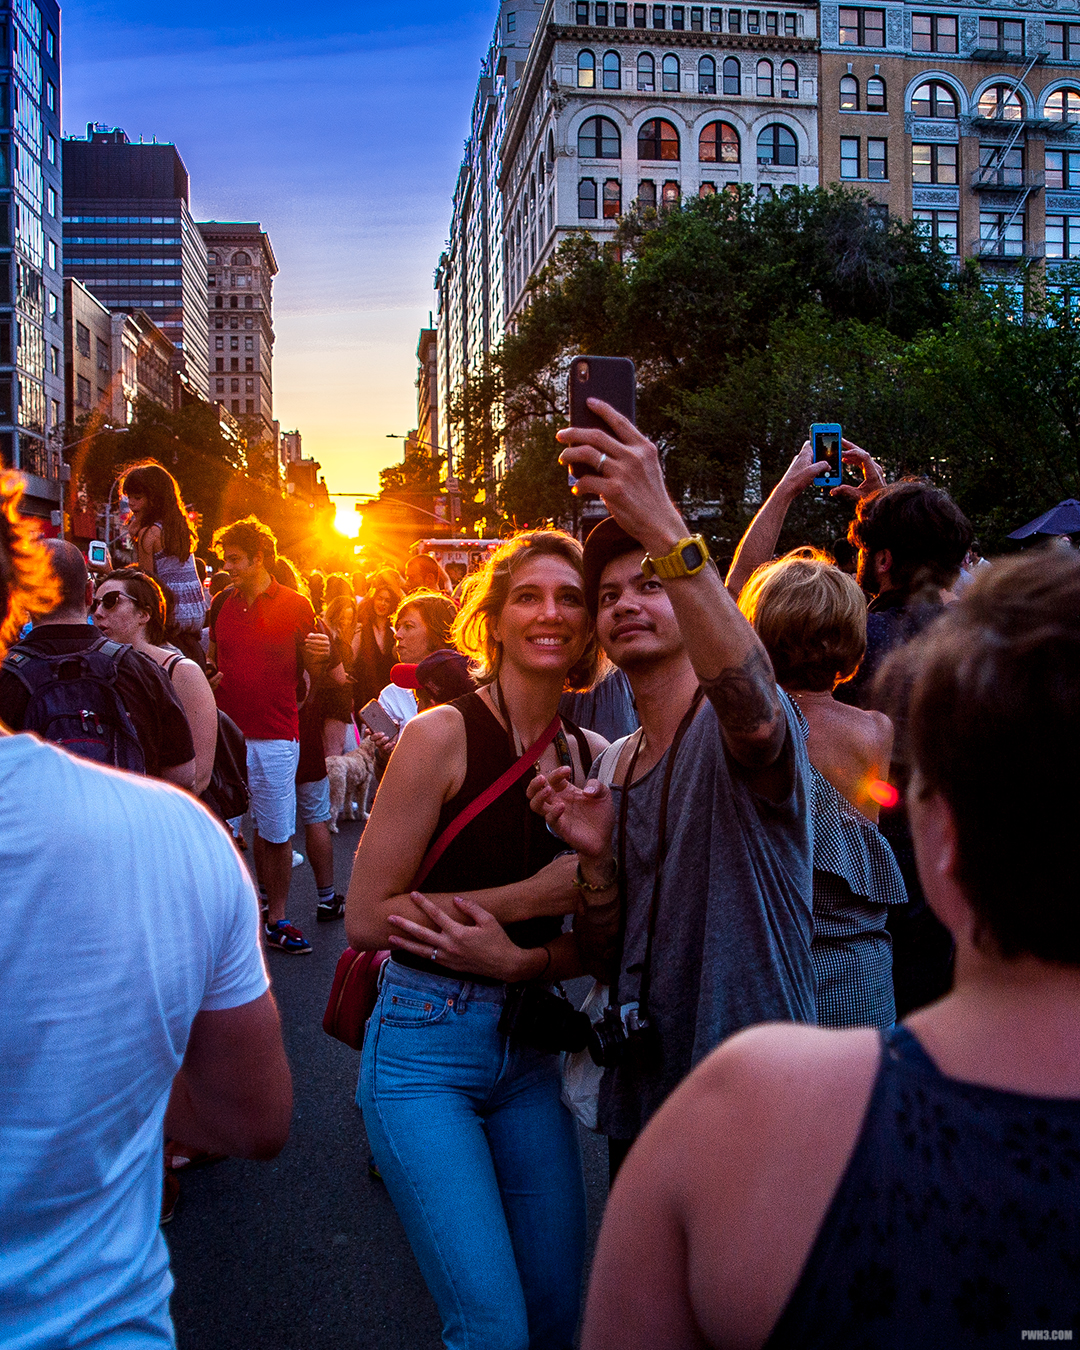
In high-contrast scenes where you may need to lift the shadows — such as trying to capture a group of people as they capture a sunset on their cell phones — there is a noticeable amount of noise. It’s not overwhelmingly bad, and not unlike film grain, but it definitely will be there if you try to salvage a photo taken under difficult conditions.
Manhattanhenge Love. Nikon D700 and “Streetsweeper” 24mm-120mm f3.5-f5.6D lens at 24mm, ISO 200
Low Light Performance
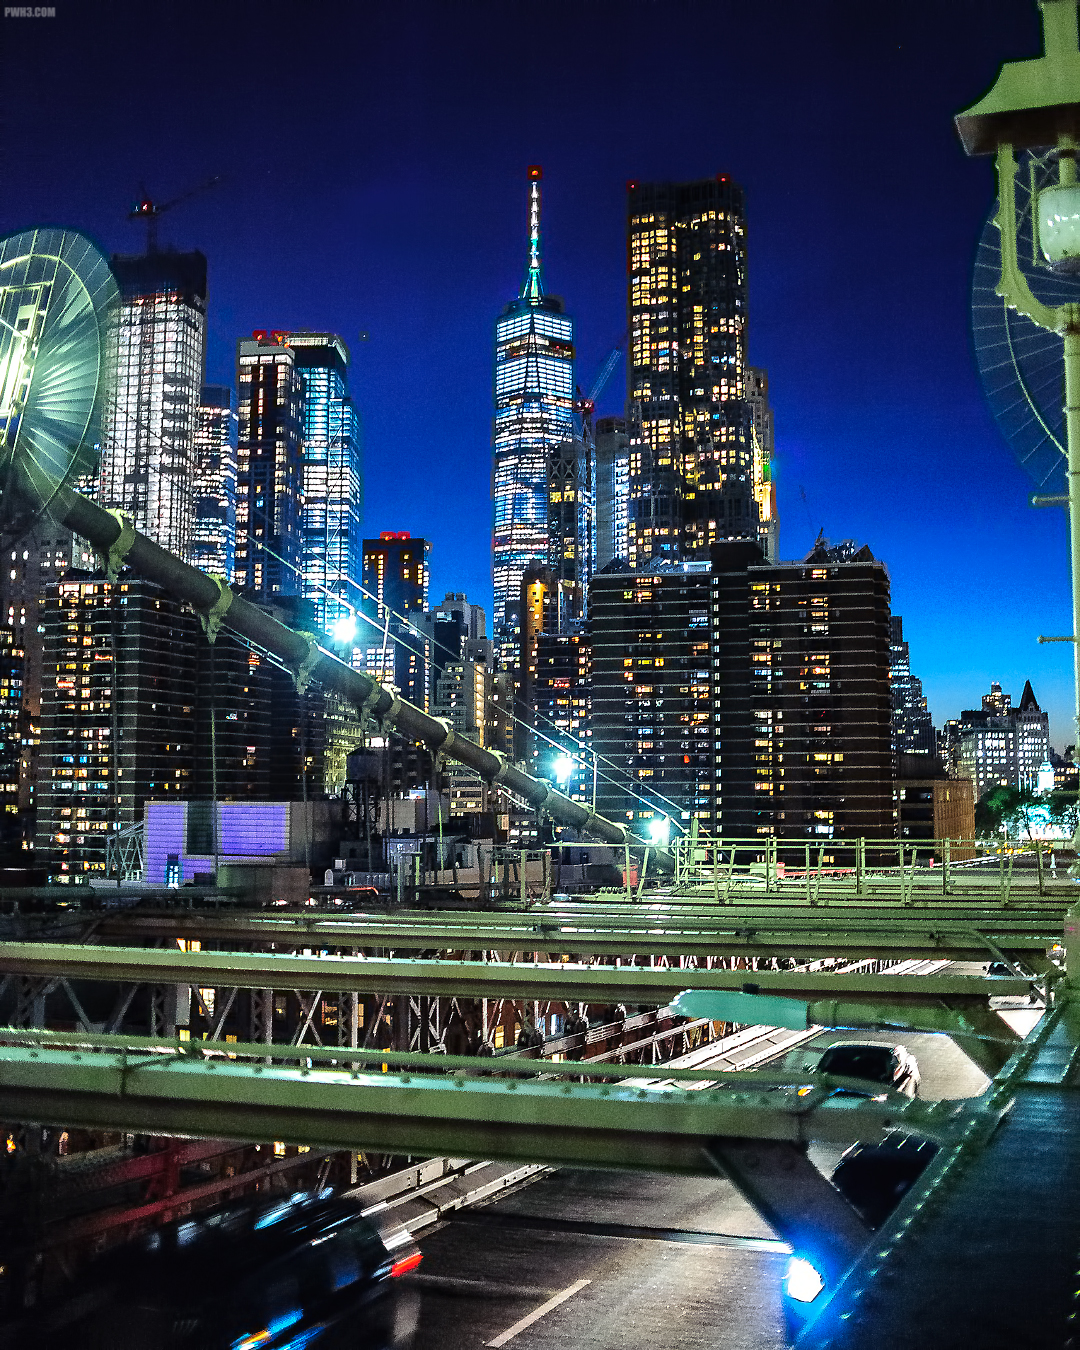
Noise is also noticeably present in high-ISO shots and night shots. In addition to noise, some night shots suffered from vertical AND horizontal banding at ISO 3200 and higher. If you shoot a lot of night shots like I do, I would say ISO 5000 is your usable limit in terms of noise. But you’re better off staying at ISO 3200 and below.
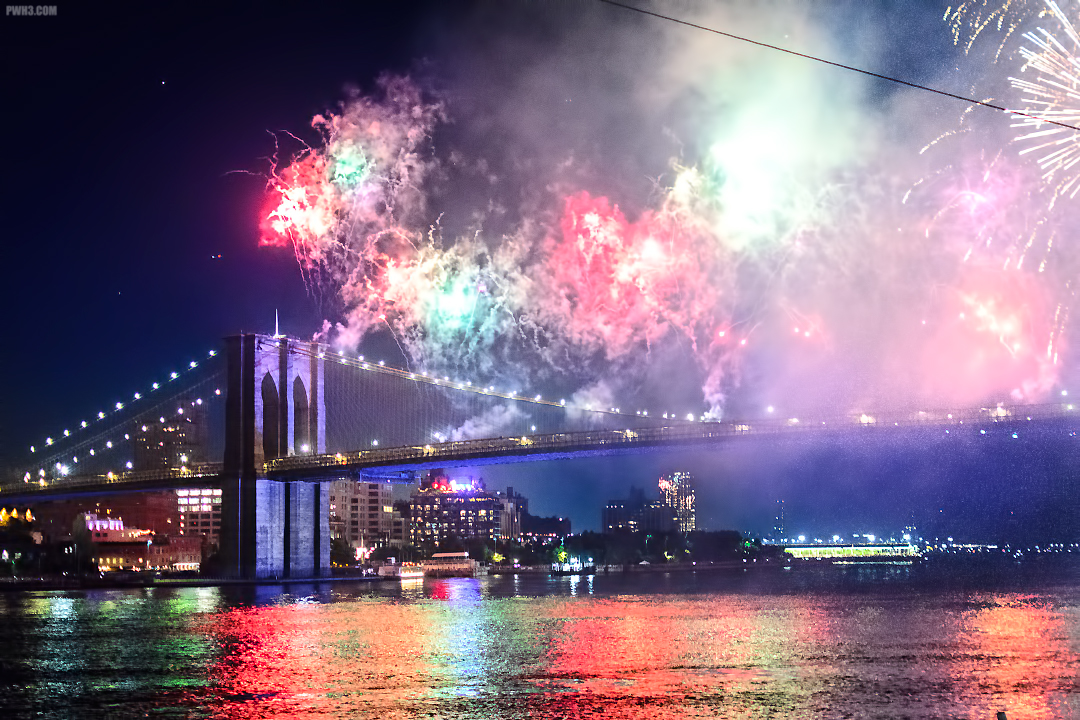
One World Trade Center as seen from the Brooklyn Bridge at night. Nikon D700 and 35mm 1.8G DX (yes, DX!) in FX mode, ISO 3200.
Other Things to Consider
This is an old camera, and the people who owned them were often professionals or serious enthusiasts. Therefore if you buy one it will probably have a very high shutter count. It’s likely that any one you pick up will have a shutter count of well over 100,000 actuations, and possibly over 200,000 actuations. The more actuations your camera’s shutter has, the more likely it is (statistically) that you’ll encounter a shutter failure which will need to be repaired.
If your camera suffers a mysterious problem and simply stops working, other parts needed for repair (such as LCD screens, internal electronics, the internal card reader) may be hard to come by or impossible to obtain.
The camera uses Compact Flash (CF) Cards instead of SD cards, so if you don’t have CF Cards laying around, that will be another thing you’ll need to buy. You will also need an external CF Card reader since no computer or laptop has a built-in CF card reader.
The Nikon D700 does not shoot video. In addition, the Live View mode is extremely cumbersome to the point of being useless, so if you’re a shooter who uses Live View often, you may want to rethink buying this camera.
If you are moving from a Nikon DX camera, you will mostly likely need to buy new lenses. Only FX lenses will work properly on this camera (except for the 35mm DX lens which actually does work pretty well, but that’s for another article).
Note: some of you who are Nikon DX users already have the Nikon 50mm f1.8G or f1.8D lenses which you are using for portraits; those two 50mm lenses will work fine.
So, remember to factor in the cost of all of these things when deciding to purchase this camera. You may find that your “cheap entry” into full-frame has gotten rather expensive after all.
Sticker Life. Nikon D700 and 35mm 1.8G DX (yes, DX!) in FX mode, ISO 3200.
The Final Verdict
Would I recommend this camera over a recent DX Nikon? No. Even my little Nikon D5100 from 2011 performs better in terms of pure image quality and produces much better colors. It even handles noise better. The D700 is not a bad camera, especially for one that’s over a decade old. But technology has moved on and made significant improvements every area.
Would I recommend this camera to someone looking to buy their first full-frame camera? Maybe. The prices of used full frame cameras are all dropping. For a few hundred dollars more, you could pick up a used Nikon D610 or Nikon D750 which would produce much, much better low-light images. So if you’re a night or low-light shooter, I’d lean towards no. If you shoot mostly in the daylight or at well-lit events, then go for it.
I definitely recommend the D700 for people like me, who fall into the “always wanted one” category and are willing to put up with — or just don’t care about — the limitations of using an older camera. If you just want one, I feel like that alone is a perfectly fine reason to get one.
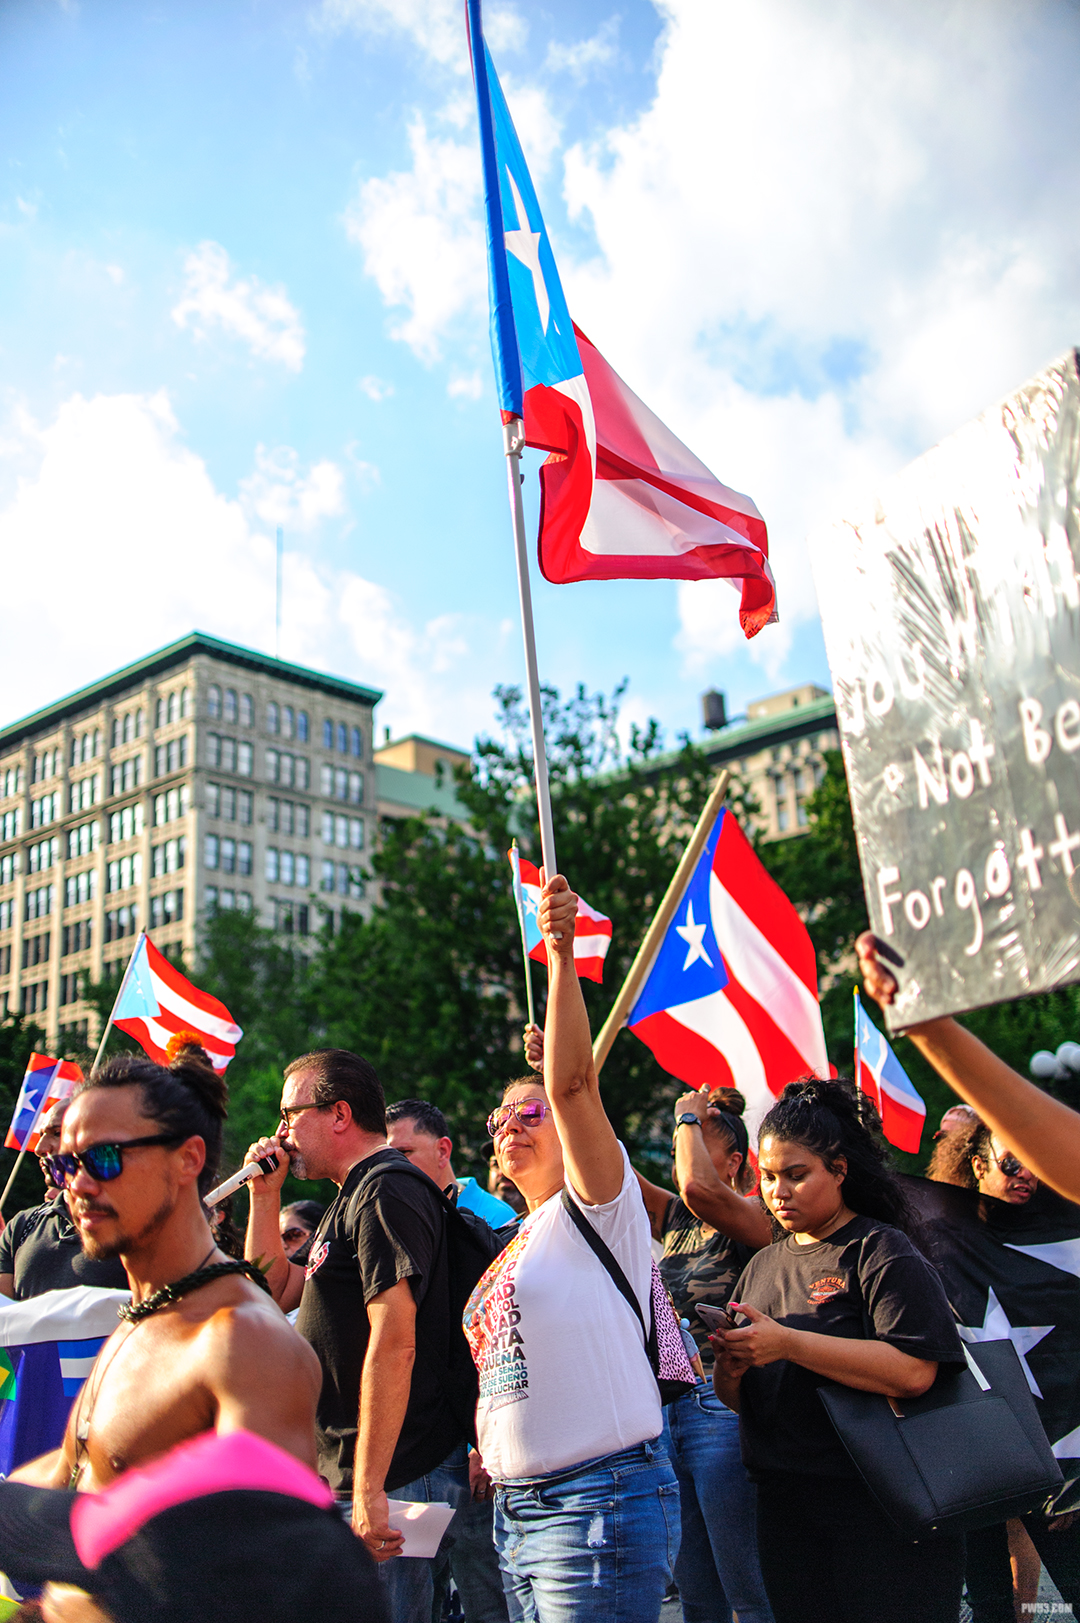
“Renuncia Ricky” protest in Union Square. Nikon D700 and 35mm 1.8G DX (yes, I said DX!) in FX mode, ISO 200.
What are your thoughts on the Nikon D700? Leave a comment below if you are still using this camera in the year 2019 (or now, 2020) and tell me what you think about it. And consider following me on Instagram.
Most beginning photographers will have a crop-sensor camera, such as the Nikon D3300 that I recommended in the article. Without getting crazy technical here, using a crop-sensor camera always means that the millimeter number on the lens (in this case 35mm) is multiplied by 1.5. That means that this lens will give you the rough equivalent of a classic 50mm field of view.
The Nikon 35mm f1.8G DX lens looking all sexy on my bed. Photo taken with a Samsung Tablet.
Sharp, Light and Small
The Nikon 35mm is a lightweight lens. It’s perfect for carrying around all day long and using in a variety of situations. It’s useful for photos of people, close-up shots of objects, and even landscapes. The lens is very sharp and delivers images with quite a bit of detail.
Keep in mind that the lens is a prime lens with a fixed focal length – meaning that you can’t zoom with it. If you need to get closer to your subject, you’ll have to actually walk towards it!
Yes, you can fit everything in the shot even though it’s not a zoom lens!
Cheap and Popular
The lens is also inexpensive. Brand new, it shouldn’t cost you more than $200 from any major internet camera retailer.
Even better, this lens is so popular that one of your Nikon-shooting friends probably owns one, and may let you try it out – at least for a few shots.
Good for Low Light and Night Shooting
The f-number of a lens tells you how much light the lens lets in, or how “bright” it is. Once again, I won’t get too technical here, but the lower the f-number, the better a lens will perform in low light situations or at night. This lens has an f-number of 1.8, which is a very low number (for comparison, a typical zoom lens has an f-number of 3.5, which is why most zoom lenses are not so good for low-light shooting).
What this all means is you can finally shoot clear, detailed pictures of your friends drinking in dimly-lit bars, or capture scenes on the streets at night that don’t look dark and grainy.
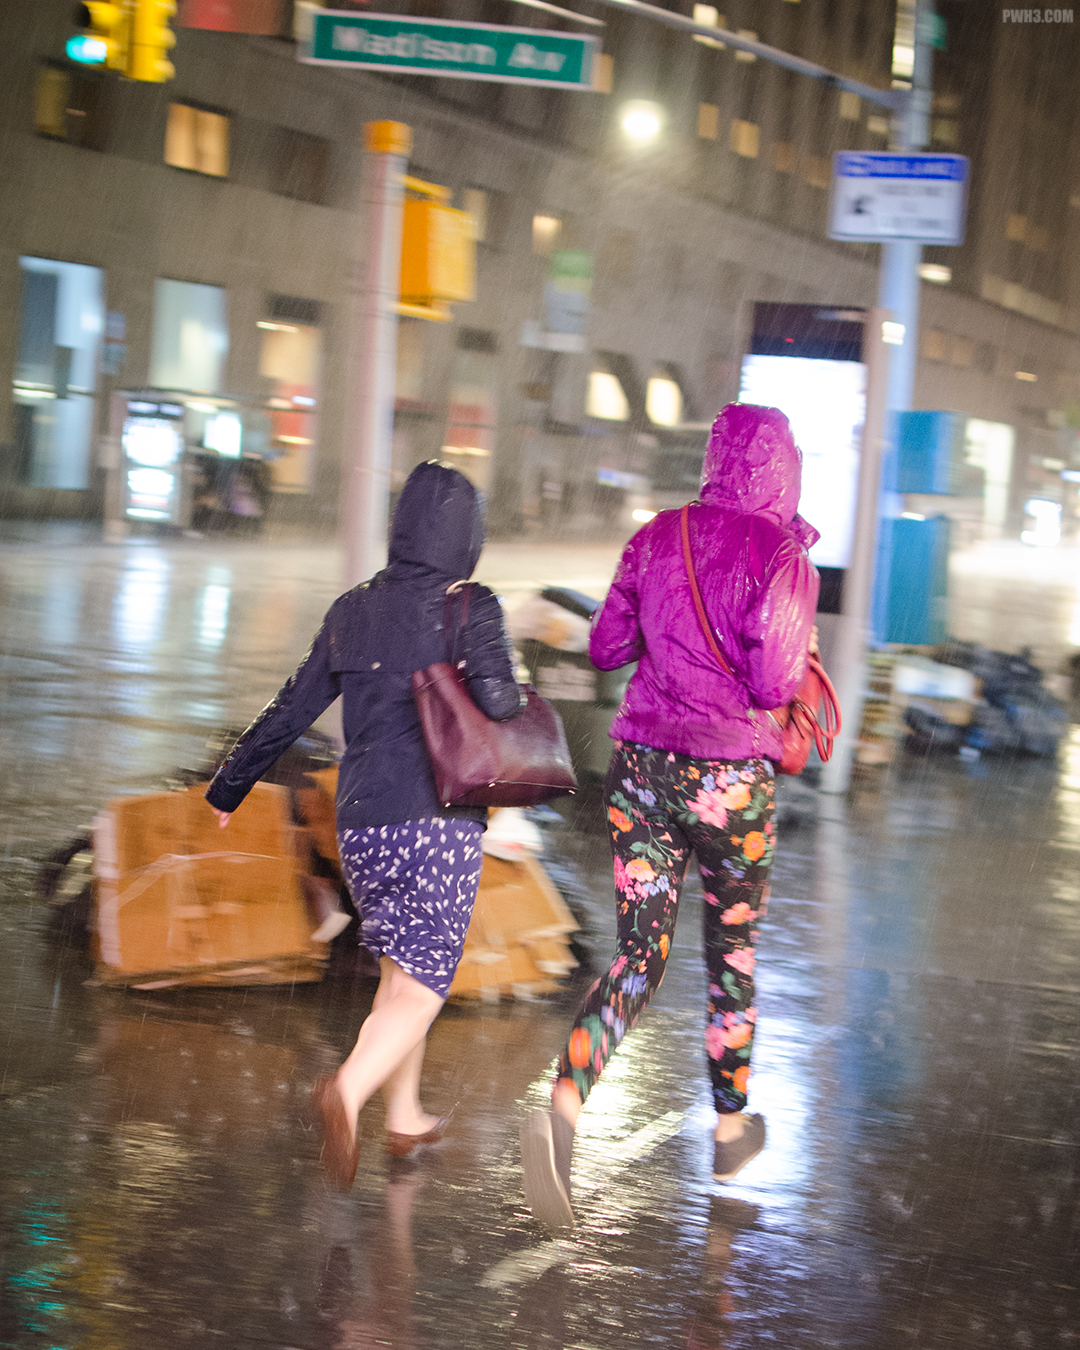
Were they running from the rain – or from me & my camera?
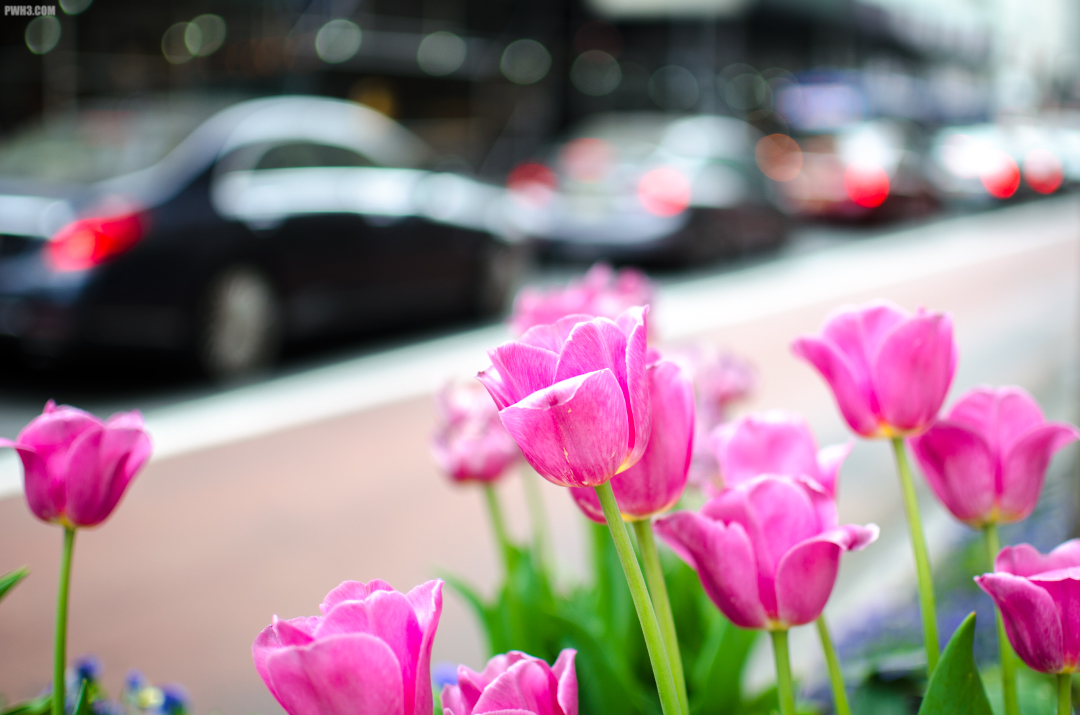
Blurred Background
Another great aspect of this lens is the ability to shoot photos with that “blurred background” look that everyone loves and craves. This makes the lens useful for casual portraits, or to isolate a subject that’s in front of a distracting background, such as a busy street.
A blurry bunch of flowers, just for you.
Nikon created a gem with this lens and even more amazing is how inexpensive it is to own. I highly recommend you go buy (or try) the Nikon 35mm f1.8G DX. Do you have this lens and enjoy shooting with it? Or are you a beginner that has more questions about it? Leave a comment below or feel free to message me on Instagram.
All photos in this article were taken with a Nikon D5100 and Nikon 35mm f1.8G DX lens. Except for the photo of the lens itself, which was taken with a Samsung Tablet & Snapseed.
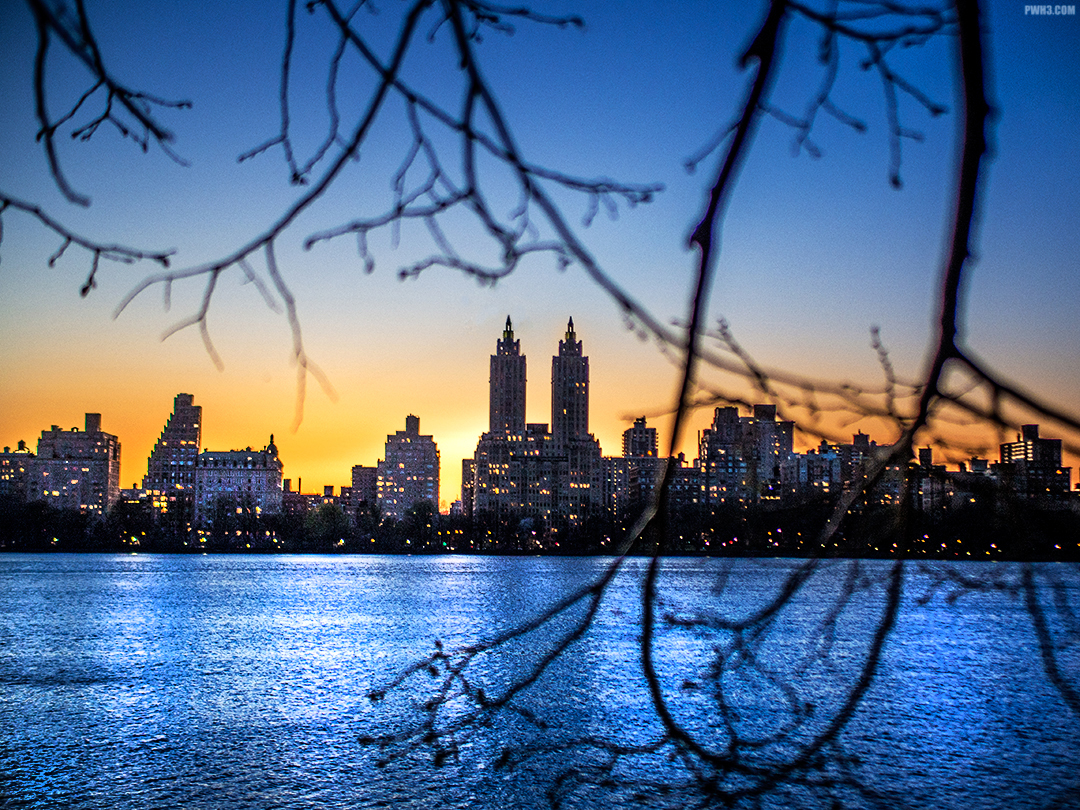
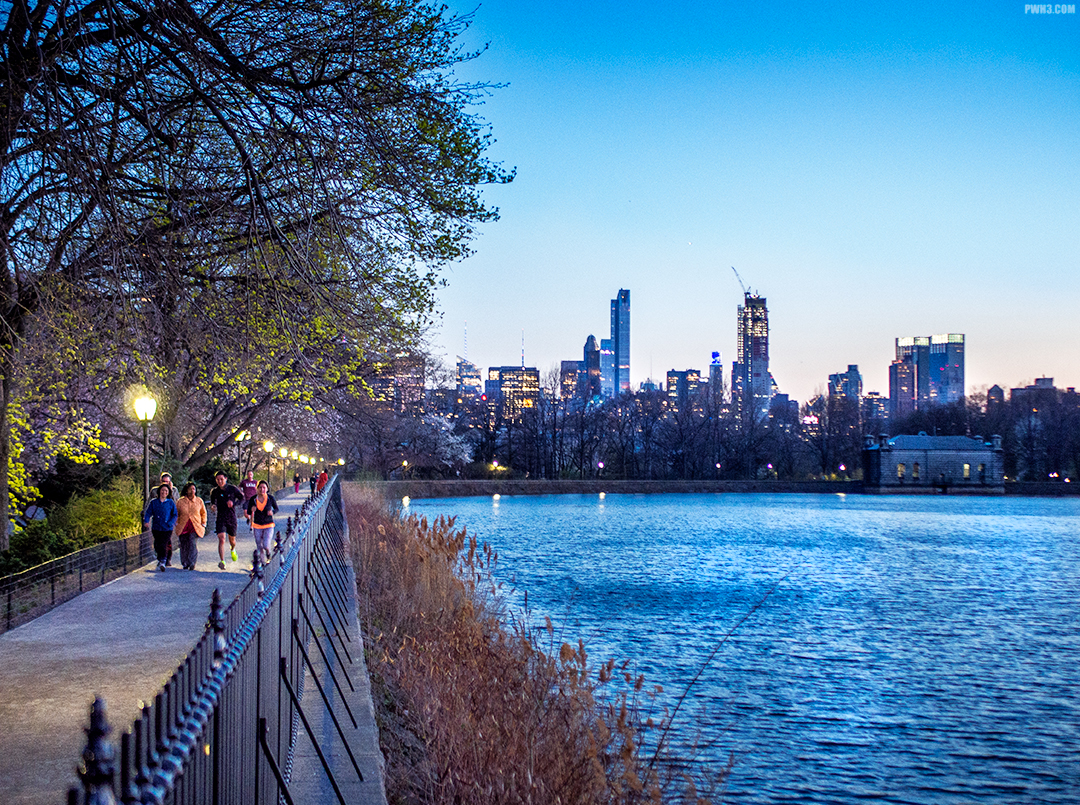
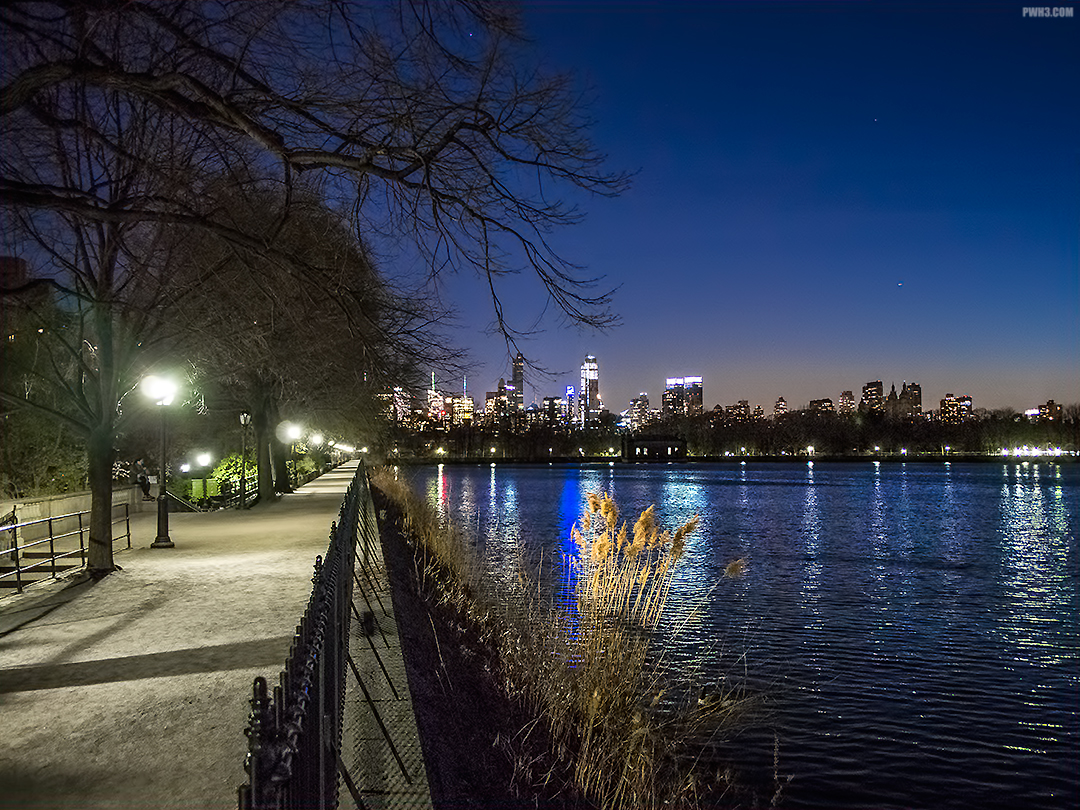
Real New Yorkers simply call it the Central Park Reservoir, but officially it’s called The Jacqueline Kennedy Onassis Reservoir. The Reservoir stretches from 86th to 96th street, and from 5th avenue to Central Park West.
It’s going to be a long walk.
I wanted a specific shot of some particular Upper West Side buildings, so I entered Central Park at 90th street and 5th avenue and walked up a few steps to the gate surrounding the Reservoir.
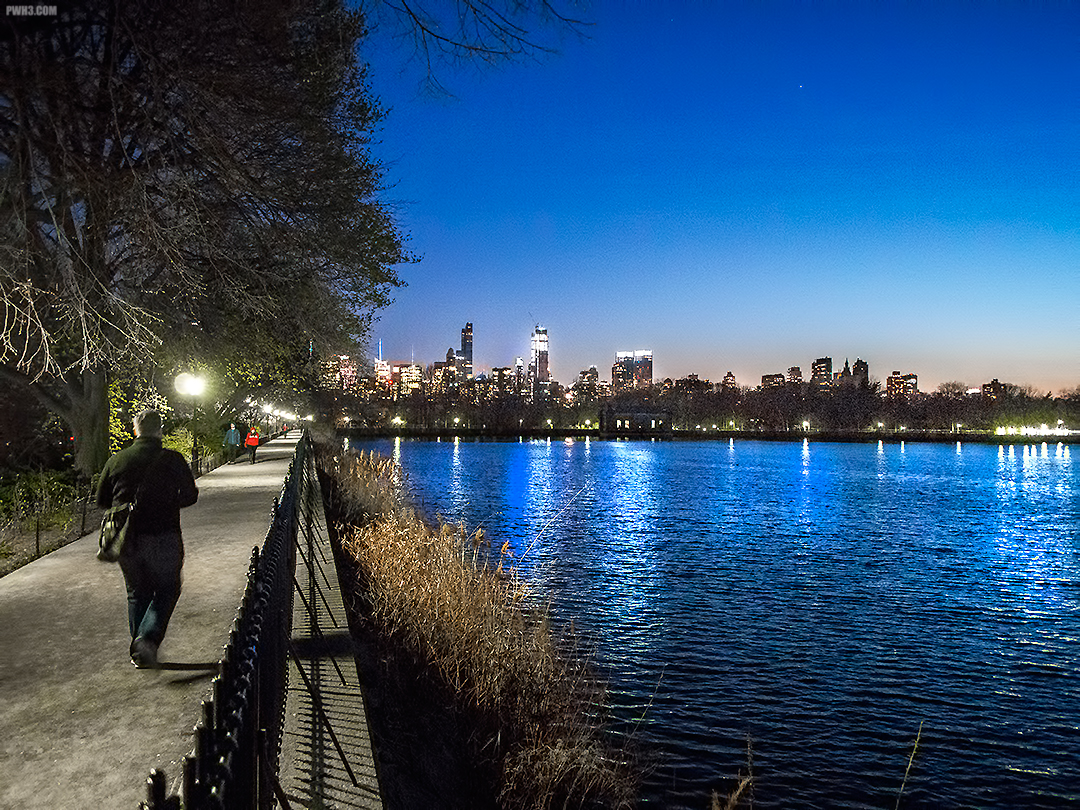
Whenever I think of the Reservoir, I’m reminded of the movie Marathon Man with Dustin Hoffman. To this day, there is a constant stream of joggers around the Reservoir, and the path around it is a sort of loose, sandy gravel to facilitate running. I wonder how many of those joggers have seen that movie.
Joggers — just like in the movies!
I didn’t know the Reservoir was decommissioned in 1993. That explains the lack of security around it and the low gate. I assume that if the Reservoir did supply New York City with water, no one would be allowed anywhere near it in this day & age.
Times Square is waaay down there.
The Central Park Reservoir is great to visit and watch the sunset on a nice day, or to jog around it if that’s your thing. There are many great views of the city and photographic opportunities to be had there.
The photos in this story were taken with an Olympus EM-10 and Lumix 14mm f2.5 & Lumix 25mm f1.7 lenses.
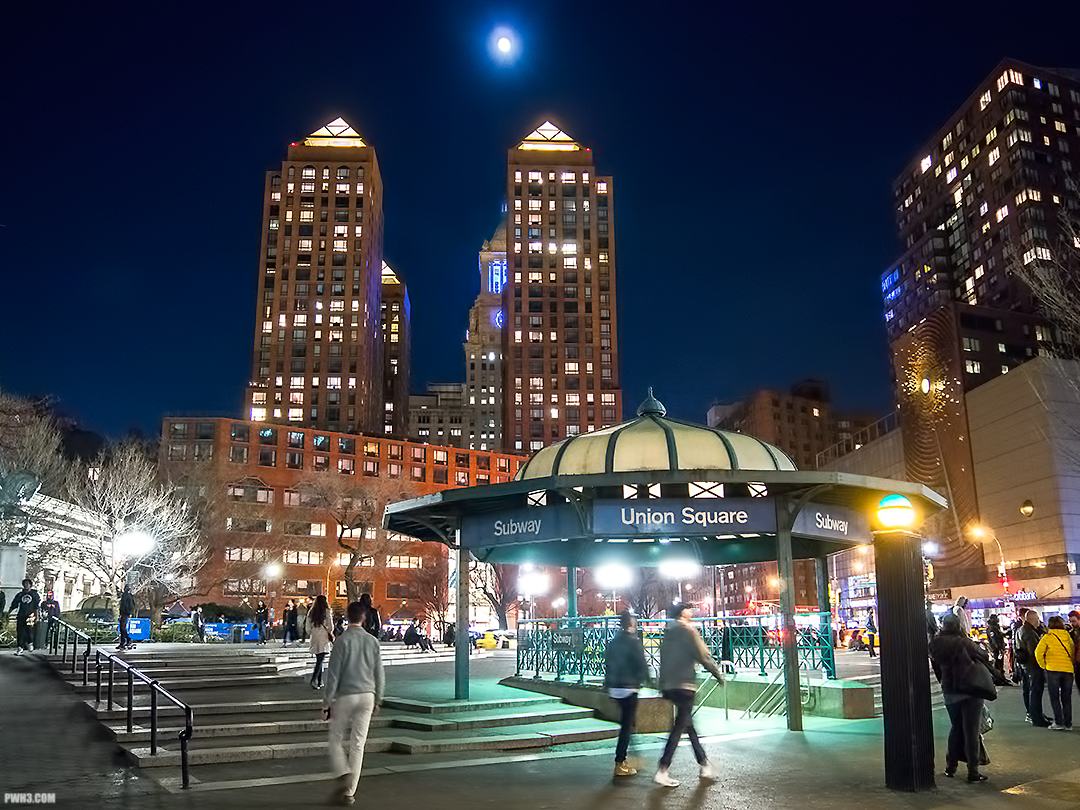
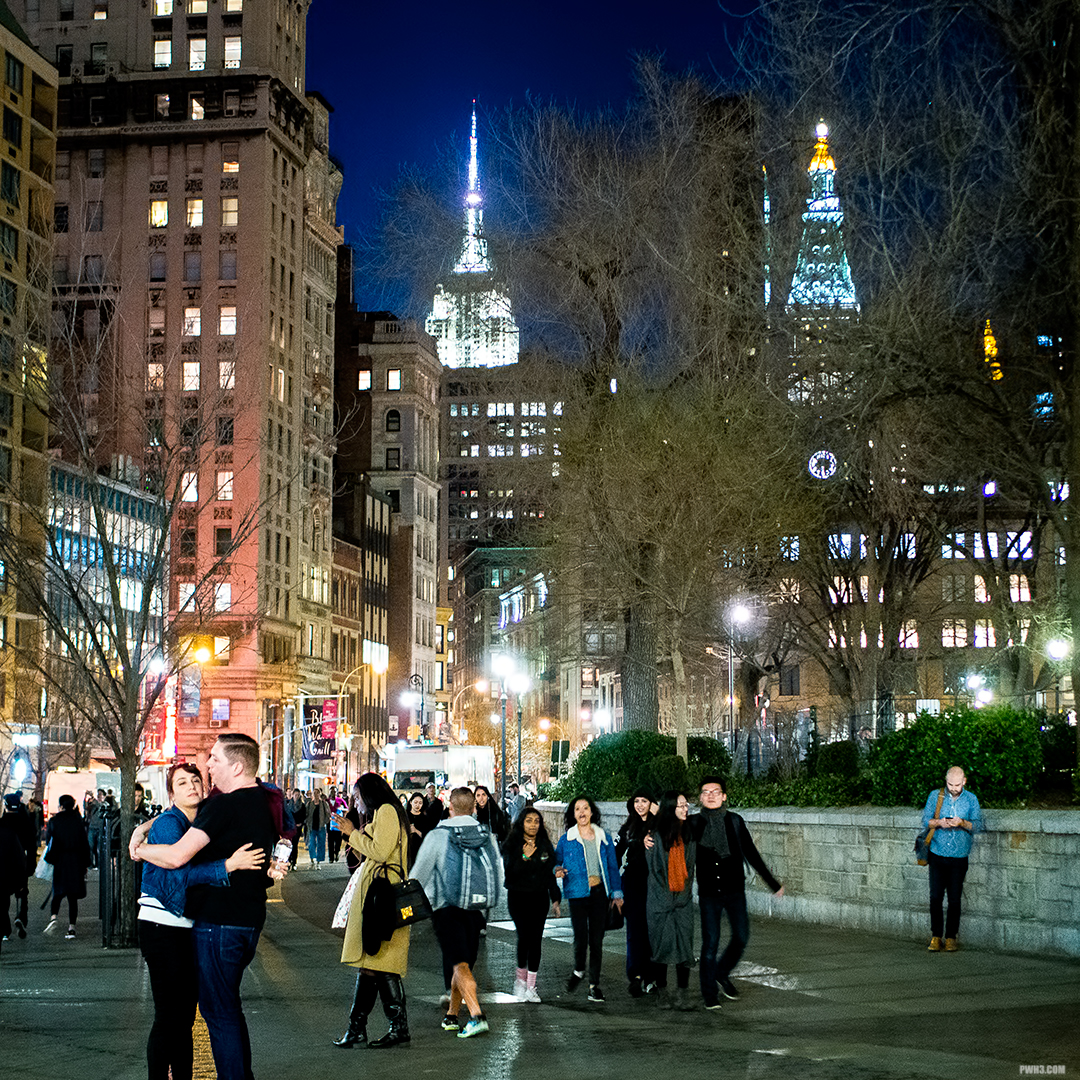
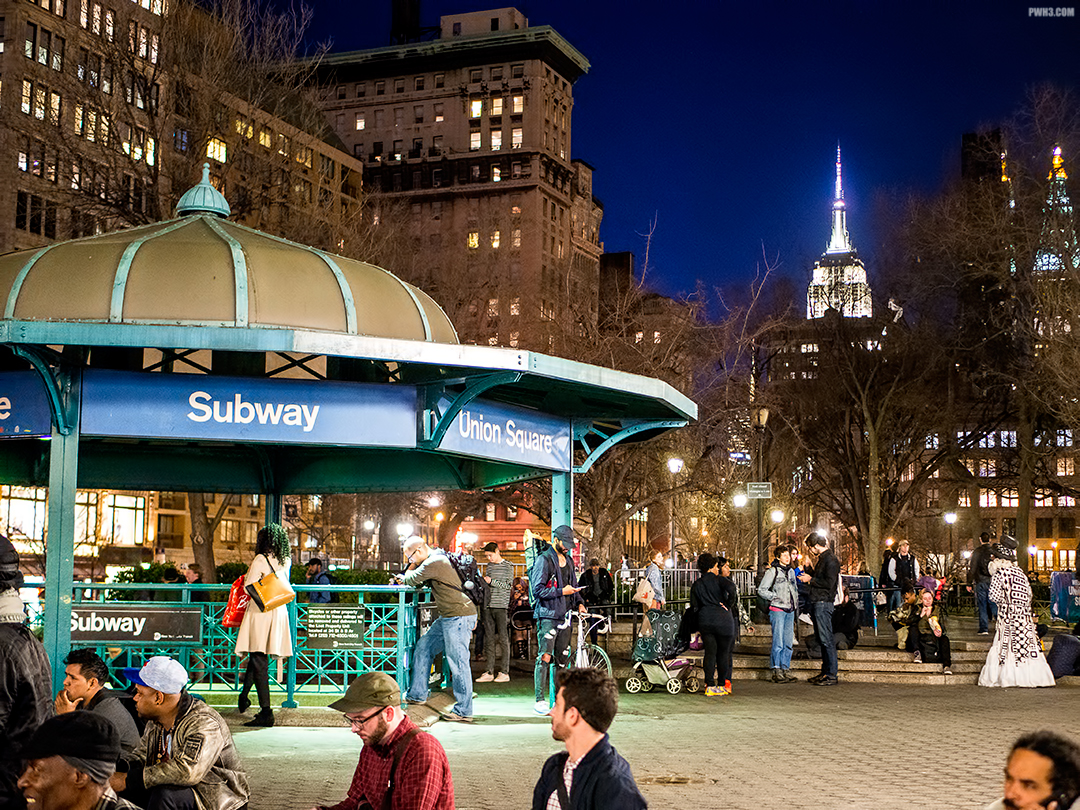
Union Square is one of my favorite places in New York City. It’s often the starting point for many interesting nights out. Union Square is also a great place to just sit down and relax — some nights, it’s the only destination.
A typical night in Union Square.
In the warmer weather you’ll find young people playing hacky sack or soccer. You’ll see skateboarders practicing kickflips and ollies, while street performers dance for dollars. There’s even a freestyle rap group that meets up there on Friday nights. And let’s not forget the chess players. Drop in a for a friendly game.
It’s all very friendly. Maybe.
In practical terms, Union Square is a major transportation hub. You can catch many subway trains here (4, 5, 6, L, Q, N, W and R). The L train can connect you to the 8th Avenue Line, so you’ll be able to catch the A, C, E after a quick ride.
Enter the subway. Or just hang around it.
Union Square Park stretches from Broadway to 4 Ave and from East 14th street to East 17th street. You can access the subway from many entrances in the park.
The photos in this story were taken with an Olympus EM-10 and various lenses.
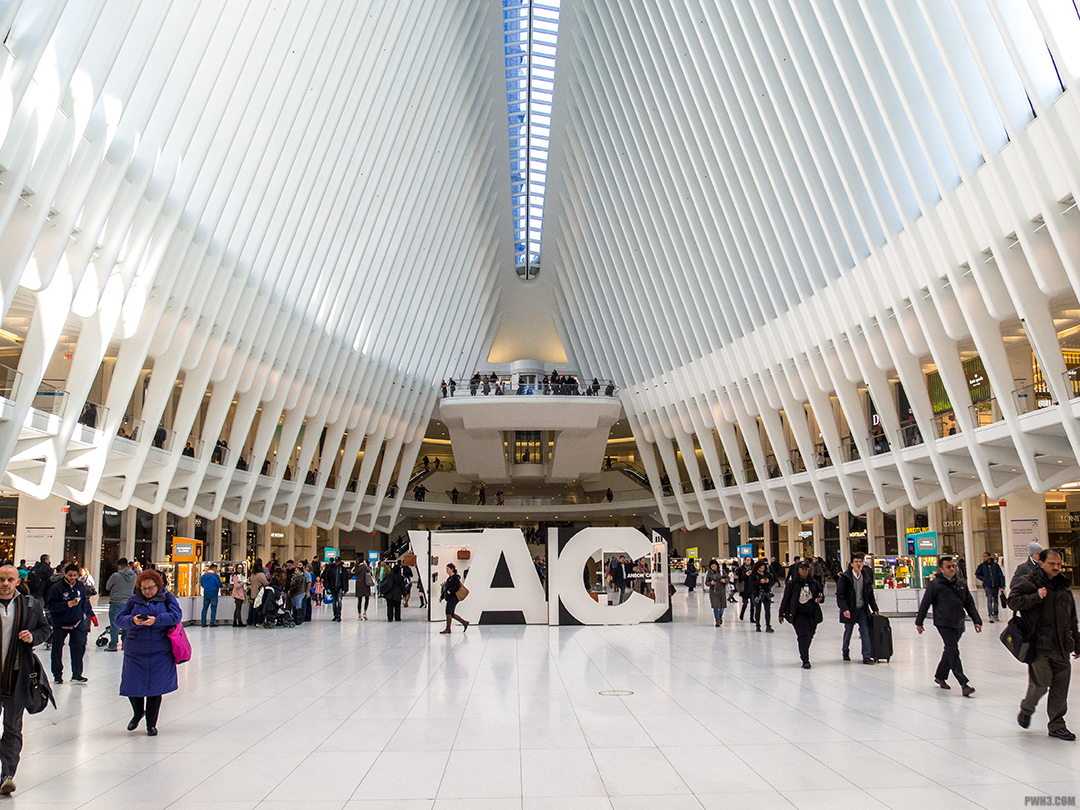
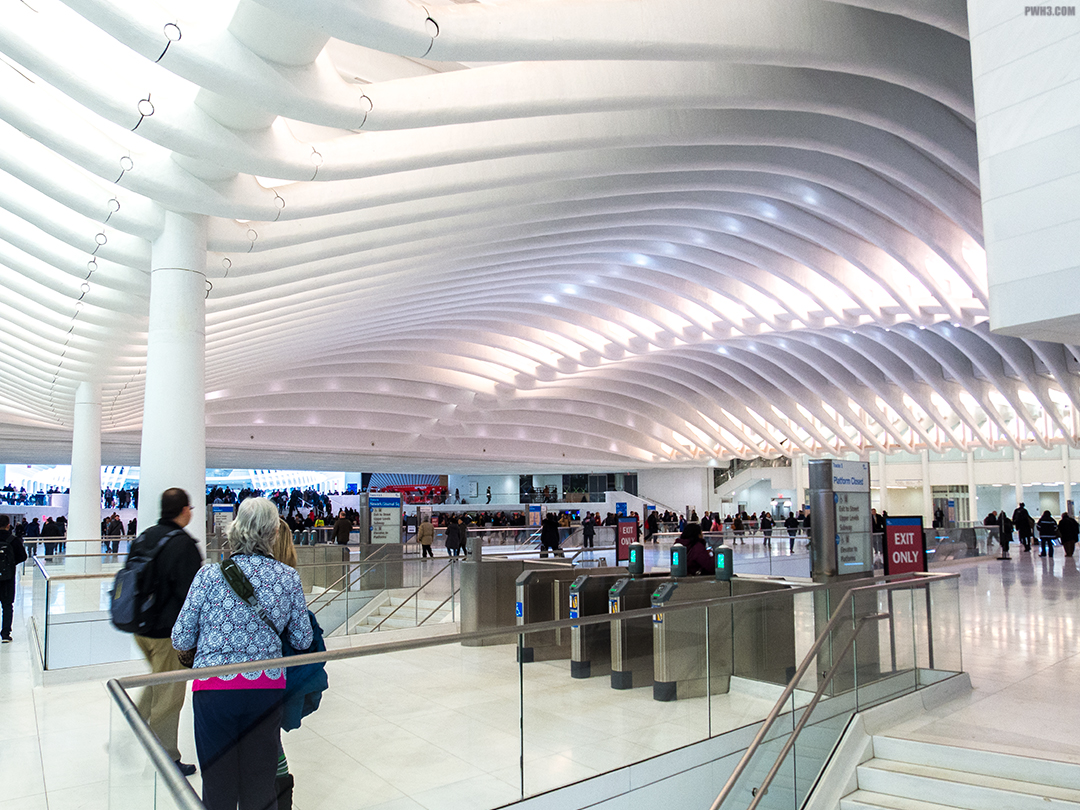
The World Trade Center Station is a transportation hub that connects New Jersey trains to New York trains. The centerpiece, called the Oculus, can be thought of as the main station house.
The Oculus — surrounded by other, less-dramatic buildings.
Inside the Oculus is what’s technically the Westfield Mall. There are said to be over 100 retail stores and restaurants in the Mall, including an Apple Store, Banana Republic and an Eataly.
High-tech and futuristic all the way.
Designed by Spanish architect Santiago Calatrava, the whole structure is supposed to resemble “a bird being released from a child’s hand.” I found it to feel more like being inside of some kind of futuristic dinosaur, since the curved beams reminded me of bones or ribs. It did have a very organic feel to it, and I did like the overall look of the place. It’s a bright, open space and if you enjoy shopping and dining out you can surely spend a lot of time inside of it.
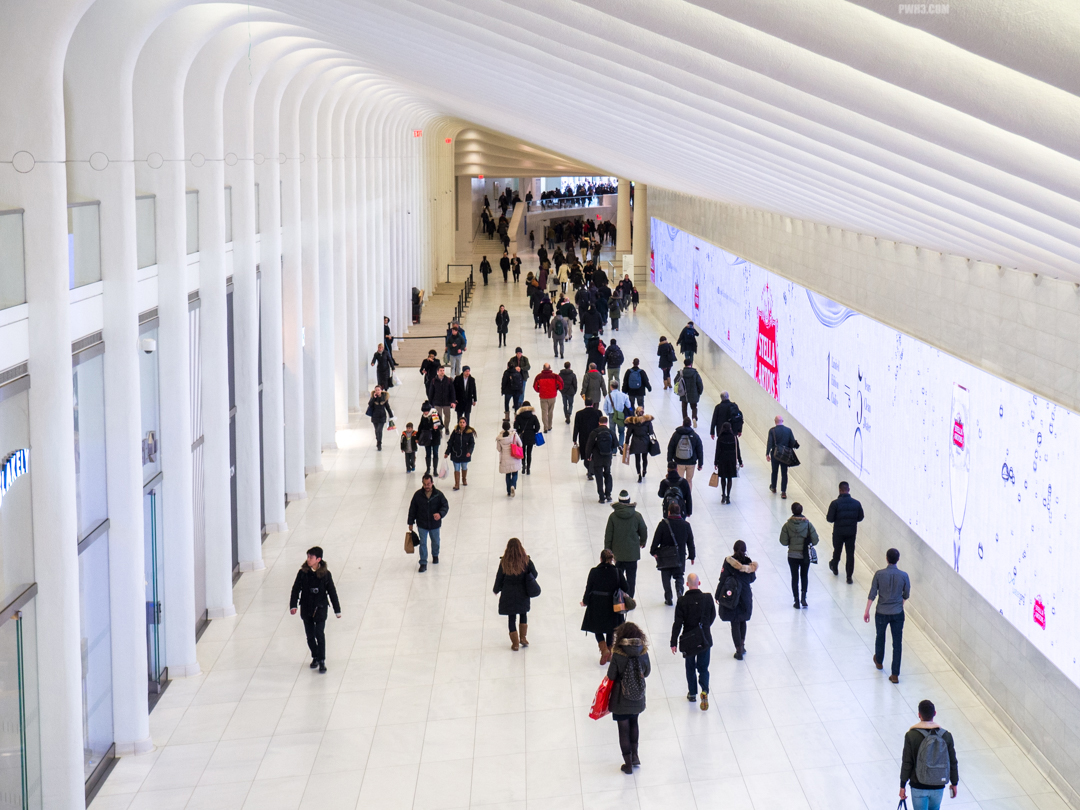
It’s a… hub… of activity.
From a commuting standpoint, the Station lets you access the PATH system to get to New Jersey, as well as many (the 2, 3, A, C, E, N, R, W) New York City Subway trains.
I hope you didn’t lose your Metrocard.
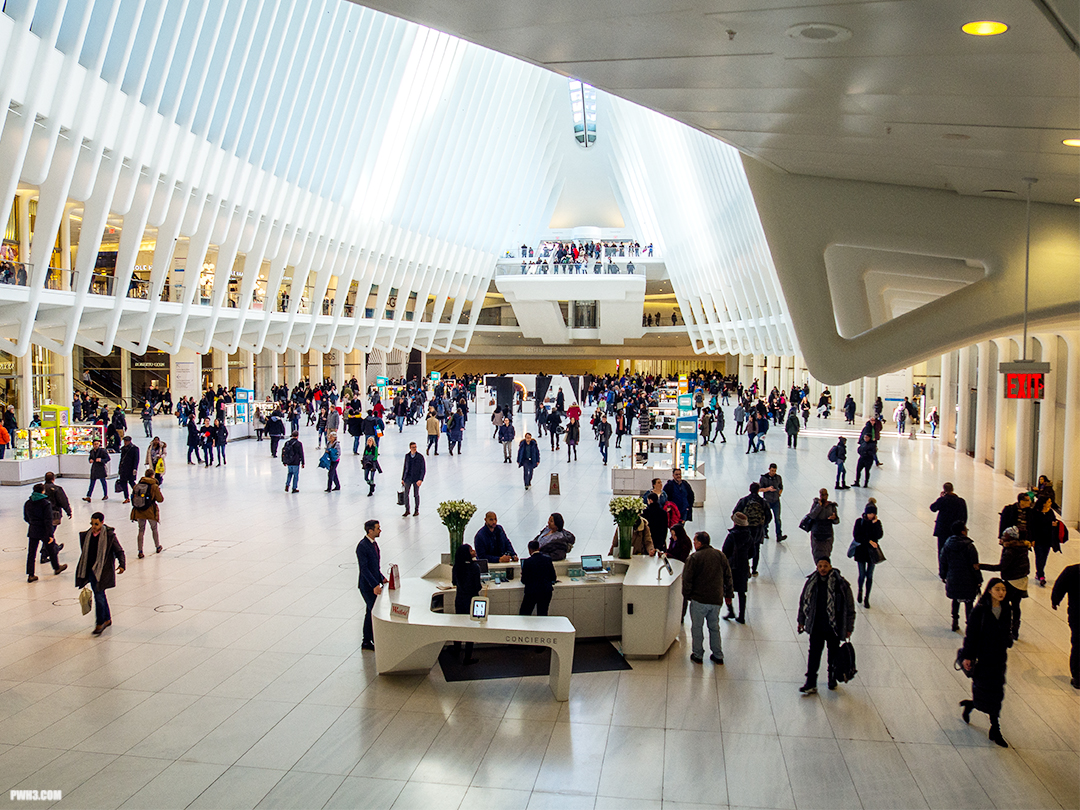
If you’re vacationing in New York City, you might as well check the Oculus out while you’re here. You’ll probably stumble into it after you’ve visited the One World Trade Center Observatory anyway. If you’re a New Yorker you can skip this place until you, for some reason, have to take a PATH train to New Jersey and can’t do it from Penn Station.
The photos in this story were all taken with an Olympus OMD EM-10 and the Olympus 14-42 RII kit lens.
This image is also featured in my article Why You Should Shoot RAW. You can see the original version in that blog entry and get some information about the benefits of RAW. Taken with a Nikon D5100 and 35mm f1.8DX lens from the backseat of a taxi.